
Unlock seamless data workflows with our ultimate guide to CSV to Google Sheets. Learn manual, automated, and advanced methods to import data flawlessly.

Tired of manually copying data from a CSV file into Google Sheets? You're not alone. Let's get that static data into a dynamic, collaborative workspace where it belongs. The easiest way is through a simple but powerful menu: File > Import. This one command is your gateway to transforming a simple data file into your team's single source of truth.
Why Nailing CSV Imports is a Game-Changer
Let's be real: manual data entry is a soul-crushing task. Copying and pasting endless rows of sales leads, marketing data, or product pricing is more than just boring—it's a recipe for errors and wasted time. This is why mastering the flow of data from a CSV into Google Sheets isn't just a neat trick; it's a fundamental business advantage.
Once you have this process down, Google Sheets becomes mission control for your data. It’s where raw numbers from data collection tools like Clura finally start making sense and turn into actionable insights. Mastering this skill is your express ticket out of data grunt work and into smarter, faster decision-making.
The Real Pain of a Messy Import
A botched import is way more than a minor annoyance. We've all been there: spending an hour untangling jumbled columns or fixing weird formatting mistakes minutes before a big presentation. These "little" frustrations drain productivity and put the brakes on important decisions. A clean import process gives you back your most valuable asset: your time.
Getting this right pays off, big time. You'll immediately see the difference:
Speed: Pull in huge datasets in seconds, not hours.
Accuracy: Say goodbye to the typos and errors that come with copy-pasting.
Collaboration: Let everyone on your team work from the same live, up-to-date information.
Automation: This is the first step toward building workflows that keep your data fresh automatically.
The Massive Shift to the Cloud
The world runs on cloud-based tools, making this skill absolutely essential. In 2023, Google Workspace—the engine behind Google Sheets—had a staggering 3 billion users globally. As teams move away from desktop software like Excel, businesses are now handling an estimated 10 trillion CSV imports every year.
This isn't a new trend, but the remote work boom threw gasoline on the fire. Between 2020 and 2022, conversions from CSV to Google Sheets shot up by an incredible 250%. You can explore more of these stats over at Coefficient.io.
This is about more than just moving data. It's about creating a dependable, scalable system for your information. When your CSV import is flawless, you unlock the full power of your data and your team.
At the end of the day, knowing how to properly import a CSV into Google Sheets is one of the most valuable, high-impact skills you can learn. It’s the foundation for better analysis, smarter decisions, and a workflow that actually works for you.
3 Simple Ways to Manually Import a CSV Into Google Sheets
Sometimes you just need to get the data in the sheet. Right now. Forget scripts or automation—you have a list of contacts from an event or a quick sales report, and you need it in a spreadsheet. This is where manual methods shine.
These are the bread-and-butter techniques every Google Sheets user should have in their back pocket. They’re fast, direct, and get the job done in seconds.
Not sure if a manual import is the right call? This flowchart breaks it down perfectly.
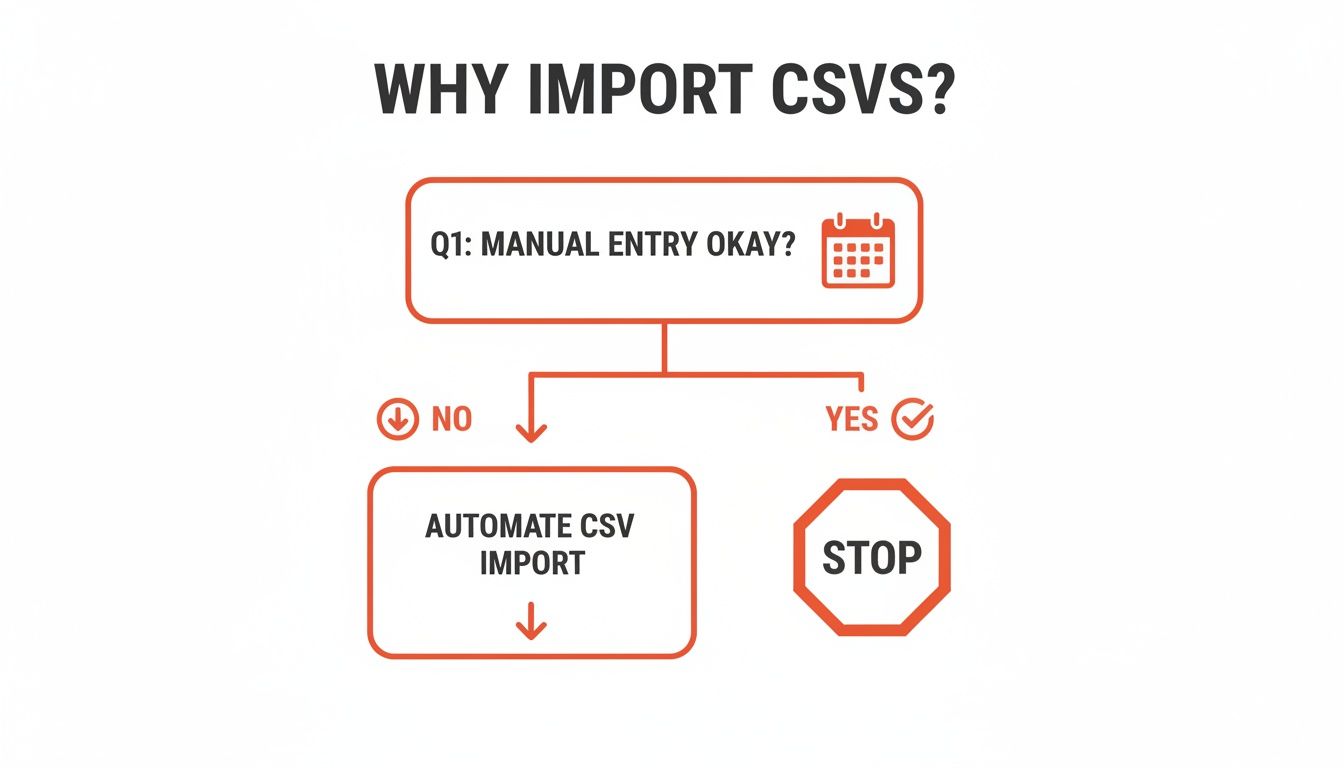
The takeaway is clear: if you’re doing the same import over and over, you absolutely need to automate. But for a one-off task? Manual is king.
Method 1: The Classic File Import Menu
This is the tried-and-true method, and for good reason—it gives you the most control. When you have a file that's a little unusual, this is the tool you want.
Open your Google Sheet (new or existing).
Go to File > Import.
Click the Upload tab in the window that appears.
Drag your CSV file into the window or click "Select a file from your device" to find it.
Once uploaded, Google Sheets presents the "Import file" screen. This is where you tell Sheets exactly how to handle your data.
Pro Tip: Immediately check the "Separator type" option. Sheets is smart, but sometimes it guesses wrong. If your data looks like a jumbled mess, it’s probably because the CSV is using semicolons or tabs instead of commas. Manually picking the right separator here will fix 90% of your import headaches instantly.
There’s a reason this menu is so famous. A 2024 guide on this exact topic pulled in 1.2 million views in just 90 days, with 65% of viewers being sales and marketing pros eager to master the 'Replace' vs. 'Append' options. See how the pros use these settings on YouTube.
Understanding Your Import Options
When you use the File > Import method, you get a handful of powerful choices. Here’s what they mean:
Import location: This is where the data will go.
Create new spreadsheet: Makes a brand-new Google Sheet file.
Insert new sheet(s): Adds a fresh tab to your current spreadsheet.
Replace spreadsheet: DANGER! This deletes everything in your current file and replaces it with your CSV.
Replace current sheet: Overwrites only the data in the tab you’re currently viewing.
Append rows to current sheet: My favorite for ongoing lists. It adds your new data to the bottom of what's already there.
Separator type: The key to clean columns (comma, tab, semicolon, etc.).
Convert text to numbers, dates, and formulas: Leave this checked 99% of the time. Only uncheck it if you have data like ZIP codes with leading zeros (e.g.,
01234) that must be kept as text.
Method 2: The Quick Google Drive Drag and Drop
Have a clean, simple CSV? This method is almost laughably easy and perfect for speed.
Just open your Google Drive, find the CSV file on your computer, and drag it into the Drive window. Poof. Google Drive instantly converts it into a Google Sheet for you. A new file will appear with the same name, but with the green Sheets icon.
This is the best choice when you don't need to tweak any settings. It assumes a standard comma-separated file and just works. To ensure it goes smoothly, make sure your file is a properly formatted CSV. If you're coming from Excel, our guide on how to save an Excel file as a CSV can help.
Method 3: The Safe Upload and Open from Drive
This method is a slight twist on the drag-and-drop. It's fantastic if you prefer to organize your files in the right Drive folder first.
Upload your CSV to Google Drive using the + New > File upload button.
Once it’s there, right-click the file and choose Open with > Google Sheets.
Google will create a new Google Sheet, leaving your original CSV file completely untouched. It’s a super safe way to get your data into Sheets without worrying about messing up the source file.
Choosing Your Manual Import Method
Still not sure which one to use? Here's a quick cheat sheet.
Method | Best For | Key Feature | Potential Pitfall |
|---|---|---|---|
File > Import Menu | Messy or complex files | Total control over separators & location | Takes a few more clicks |
Drive Drag & Drop | Clean, standard CSVs | Fastest method, zero clicks in Sheets | No import options to configure |
Upload and Open | Organizing files first | Creates a new Sheet, preserves original CSV | A two-step process |
Each manual method has its place. The trick is knowing which one to grab for the task at hand to get your data where it needs to be with zero fuss.
How to Automate CSV Imports for Ultimate Efficiency
Manually importing CSVs is fine for a one-time task, but what about data you need refreshed daily or weekly? This is where the real magic happens. It’s time to move beyond tedious, repetitive work and build powerful, automated workflows that run while you sleep.
Let's stop thinking about importing and start thinking about syncing. Here are three game-changing ways to put your CSV to Google Sheets process on autopilot, transforming your spreadsheet from a static file into a dynamic, self-updating dashboard.
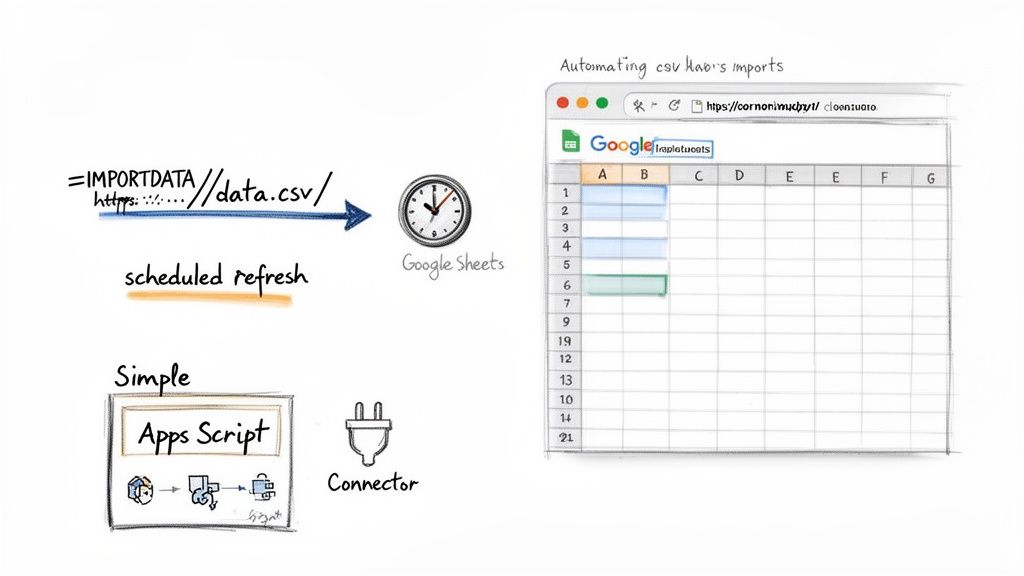
Use the =IMPORTDATA Formula for Live Data
Let's start with the simplest solution baked right into Google Sheets: the =IMPORTDATA formula. This function is an absolute powerhouse for pulling data directly from any CSV file that’s publicly available on the web.
It's incredibly easy. Just click a cell, type =IMPORTDATA("your_csv_url_here"), and hit Enter. Google Sheets fetches the data and populates your sheet. The best part? It automatically refreshes about every hour, keeping your sheet perfectly in sync with the source file.
This is perfect for:
Tracking public datasets, like stock prices or government statistics.
Syncing with reports from SaaS tools that provide a public CSV link.
Powering a live dashboard from a constantly updated data feed.
A quick heads-up:
=IMPORTDATAonly works with publicly accessible URLs. If your CSV is behind a login or stored privately, this function won't be able to reach it.
Level Up with Google Apps Script
What happens when your CSV file lives securely in your Google Drive? That's when you can dive into Google Apps Script. Don't worry, you don't need to be a coding genius. A simple script can create a rock-solid automation that grabs a specific CSV from your Drive and imports it on a schedule you set.
Think of Apps Script as the brains behind your Google Sheets. You can set up a "trigger" to run your import script every morning, every week, or even every hour. This is the ultimate set-it-and-forget-it solution for your internal reporting.
For instance, imagine your sales team exports a lead list every Friday to a shared Google Drive folder. With a simple script, you could automatically grab that new file first thing Monday morning and append its contents to a master lead tracking sheet. No more manual importing—just a seamless flow of fresh data.
Use Connectors for Seamless Data Pipelines
Sometimes, the best solution is a tool built for the job. An entire ecosystem of third-party connectors and browser extensions is designed to create a seamless bridge between your favorite apps and Google Sheets. These tools are incredibly user-friendly, often requiring just a few clicks to set up a robust data pipeline.
Services like Zapier or Make let you build "recipes" that watch for a new CSV in a specific place (like Dropbox or an email attachment) and automatically push its data into a designated Google Sheet. For more advanced workflows, you can explore platforms offering a dedicated Google Sheets integration.
The demand for these tools is exploding. Chrome Web Store data from 2024 shows that a popular 'CSV to Google Sheet' extension has over 50,000 installs since its 2022 launch and a stellar 4.8/5 rating, loved by sales and marketing pros for its one-click simplicity.
Choosing the right path depends on your needs:
=IMPORTDATA: Best for public CSV URLs and quick, hands-off syncing.
Google Apps Script: Ideal for internal files in Google Drive and custom, scheduled workflows.
Third-Party Tools: Perfect for connecting various apps and building complex, code-free automations.
By embracing automation, you're not just saving time; you're ensuring your data is always current, accurate, and ready for analysis.
How to Solve Common CSV Import Errors
We’ve all been there. You import a perfectly good CSV file, and… it’s a total mess. Columns are smashed together, text looks like gibberish, and crucial data has vanished.
The good news is that nearly every import error has a simple fix. Think of this section as your personal troubleshooting guide for the most common import problems.
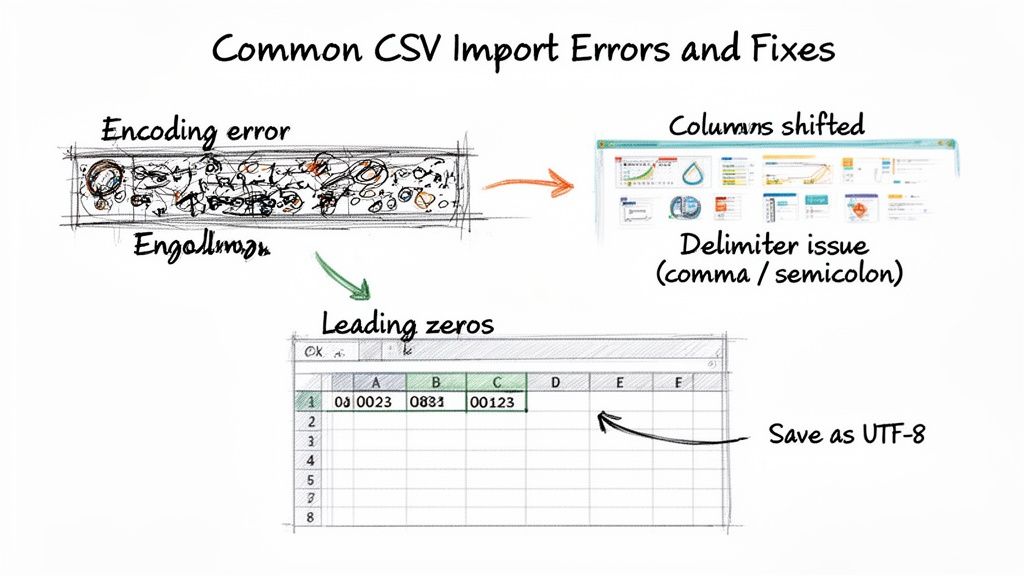
Problem 1: Garbled Text and Strange Symbols
Ever import a file and see names like "Renée" turn into "Renée"? Or find weird symbols like "�" littering your sheet? This is a classic sign of a character encoding mismatch.
Your computer saved the CSV using one "alphabet," but Google Sheets is trying to read it with another (UTF-8). The fix is simple. Before you upload, open your CSV in a basic text editor (like Notepad or TextEdit). Go to File > Save As, look for an "Encoding" option, and change it to UTF-8. Save the file and re-import it. This one step solves most strange symbol issues.
Problem 2: Jumbled Columns and Data
This is the biggest headache: your data gets crammed into the first column or is split in all the wrong places. This happens when the delimiter—the character separating your columns—isn't what Google Sheets expects.
While "CSV" stands for Comma Separated Values, many programs export files using semicolons (;) or tabs.
Here’s how to fix it in seconds:
In the import window, find the Separator type dropdown.
"Detect automatically" is the default, but if the preview looks wrong, don't import yet!
Manually select another option like Semicolon or Tab. The preview window will snap into perfectly aligned columns. When it looks right, you’re good to go.
Pro Tip: You can instantly diagnose a delimiter problem by opening the CSV in a text editor. If you see lines like
FirstName;LastName;Emailinstead ofFirstName,LastName,Email, you know to select "Semicolon" during the import.
Problem 3: Missing Leading Zeros
What happens when you import a list of ZIP codes and 07748 becomes 7748? Or an employee ID like 00192 gets chopped down to 192? This is Google Sheets being a little too helpful.
By default, Sheets converts anything that looks like a number into a number format, and numbers don't start with zero. This is a disaster for postal codes, phone numbers, or product SKUs.
The solution is to tell Google Sheets to treat the data as plain text. During the File > Import process, find the option that says "Convert text to numbers, dates, and formulas" and simply uncheck it. This forces Sheets to import everything as-is, preserving your leading zeros.
Pro Tips for Handling Large CSV Files
Importing a CSV with a few hundred rows is one thing. Trying to manage a file with hundreds of thousands of entries is another beast entirely. You’ll quickly run into Google Sheets' hard limit of 10 million cells per workbook.
Here are real-world strategies to work around these limitations and keep your sheets fast and effective, no matter the data size.
Split Large Files Before Importing
The simplest solution to a massive CSV is often the best one: don't import it all at once. Trying to upload a file that’s pushing the cell limit is a recipe for timeouts and browser crashes. Instead, slice it into smaller chunks before you open Google Sheets.
You can use a free online CSV splitter or a simple script to break a large file into smaller ones. This strategy is a lifesaver for historical or transactional data.
Split by Date: Have a multi-year sales report? Split it into separate files for each year or quarter.
Split by Category: Is your e-commerce product catalog huge? Divide it into CSVs for each product category.
Split by Region: Importing a national customer list? Break it into separate files for each state or territory.
Once you have smaller files, import each one into a separate tab within the same Google Sheet. This keeps your data organized and well under the cell limit, ensuring everything stays responsive.
Use Google Apps Script for Hands-Off Processing
Ever tried to import a large file from Google Drive only to have it time out? Google Apps Script is your secret weapon. It lets you write a simple script that reads the CSV row by row and writes the data to your sheet in small, controlled batches.
This method completely sidesteps the standard import timeout limits because it processes the file incrementally. It might take a few minutes to run, but it’s an incredibly reliable way to get huge datasets into a sheet without babysitting the process.
A common trick is to process data in batches of 500 or 1,000 rows at a time, with a short pause between each batch. This prevents the script from hitting Google's execution time limits and ensures your entire file gets imported successfully.
Know When to Graduate to a Real Database
There comes a point where your data simply outgrows a spreadsheet. If you're regularly wrestling with millions of rows and complex queries, it's time for a more powerful tool.
Google BigQuery is a fantastic next step. It's a serverless data warehouse built to handle petabytes of data with incredible speed. The best part? BigQuery has a native connector for Google Sheets. This means you can keep your massive dataset in BigQuery and use Google Sheets as a friendly front-end to run queries and pull in just the summarized data you need. It’s the best of both worlds.
Keep Your Sheets Snappy
Getting the data in is only half the battle. A massive sheet can become painfully slow if you don't manage it properly.
Here are a few tips to keep large sheets from grinding to a halt:
Avoid Volatile Functions: Functions like
NOW(),TODAY(), andRAND()recalculate every time you make a change, crushing performance in large sheets.Use Efficient Formulas: Instead of thousands of individual
VLOOKUPformulas, consider a singleARRAYFORMULAor the much fasterINDEX(MATCH())combination.Limit Conditional Formatting: Apply complex formatting rules only to the most critical data ranges you need to highlight.
Export Data with Precision: When gathering your data, only pull what you need. Many of the best data extraction software options let you select specific fields, dramatically reducing your CSV file size from the start.
By adopting these strategies, you can push the limits of Google Sheets and tackle large-scale data projects with confidence.
Frequently Asked Questions
You've got the main methods down, but real-world "what ifs" always pop up. Here are answers to the most common questions about CSV imports.
How Can I Keep My Google Sheet Updated Automatically?
This is the big one. The best way to create a self-updating dashboard depends on where your CSV file comes from.
For public CSVs on the web: Use the
=IMPORTDATA("your_url_here")formula. Pop it into a cell, and Google Sheets will automatically check for new data about every hour. It's a perfect set-it-and-forget-it solution.For CSVs in your Google Drive: Google Apps Script is the most robust solution for internal files. You can write a simple script to grab the file, import it, and set it to run on a timer—say, every morning at 8 AM.
Appending vs. Replacing Data: What's the Difference?
Choosing the right import option is crucial to avoid accidentally wiping out valuable data.
Replacing data erases whatever is in your current sheet and swaps it out with the data from your new CSV. It's a total overwrite. Appending data is friendlier. It takes the new rows from your CSV and neatly adds them to the bottom of the data you already have. This is perfect for weekly sales reports or adding new leads.
Can I Import Multiple CSV Files at Once?
Not directly. The standard File > Import menu is a one-file-at-a-time operation. You can’t select a batch of files and merge them through the user interface.
However, this is another perfect job for Google Apps Script. You can write a script that processes an entire folder of CSVs in your Google Drive, pulling data from each one and stacking it into a single master sheet. This is a game-changer for anyone dealing with daily or weekly exports split into multiple files.
Why Are My Dates and Numbers Messed Up?
This classic formatting nightmare happens when Google Sheets tries to auto-detect formats and gets it wrong. A phone number becomes a massive integer, or a European date (DD/MM/YYYY) gets mangled.
The quick fix: during the import process, when the settings window appears, find the option "Convert text to numbers, dates, and formulas" and uncheck it.
This tells Google Sheets to import everything as plain text. Once your data is safely in the sheet, you can go column by column and apply the correct formatting yourself using the Format > Number menu. It's one extra step that guarantees your data stays exactly how you want it.
Tired of the manual export-import dance? What if you could skip it entirely? Clura is an AI-powered browser agent that helps you scrape clean, structured data from any website and send it straight to a CSV in a single click. It's the perfect way to automate lead generation, price monitoring, and market research.
Explore our prebuilt templates at https://www.clura.ai and start building smarter data workflows today.
