Learn csv to google sheet in minutes: step-by-step imports, helpful formulas, and time-saving automations to streamline your data.

Getting data from a CSV file into Google Sheets is one of those simple moves that unlocks a world of possibilities. With just a few clicks in the File > Import menu, you can transform a static, isolated file into a dynamic, cloud-based spreadsheet. This single step opens the door to real-time collaboration, powerful analysis, and automated workflows.
Why Move Your CSV Data into Google Sheets?

Let's be real: a folder full of CSV files feels like a locked box. All the valuable insights, trends, and actionable information are trapped inside. Importing that data into Google Sheets is the key to unlocking its potential, and it’s a total game-changer for you and your team.
No more emailing outdated files back and forth or wondering which version is the right one. Instead, your team can jump into the same sheet to update sales figures, track project timelines, or analyze marketing data in real-time. Your raw data becomes a living, breathing asset.
Key Benefits of Making the Switch
Moving your data online offers much more than just cloud storage. When you import a CSV, you tap into an ecosystem of tools designed for modern, collaborative work.
Real-Time Collaboration: Multiple people can edit, comment, and work on the same dataset at the same time, from anywhere in the world.
Built-in Version History: Accidentally delete a crucial column? No sweat. With Sheets, you can roll back to a previous version in just a few clicks.
Powerful Integrations: Google Sheets connects seamlessly with other Google tools. Hook it up to Looker Studio for beautiful data visualizations or link it with Google Forms to automatically capture new responses.
This isn't just about moving data. It's about turning a flat, lifeless file into an interactive hub where your team can discover insights and make smarter decisions together.
To take it a step further, you can explore Sagekit's Google Sheets App to see what advanced integrations can do. But it all starts with that first, simple import from a CSV to a Google Sheet.
Method 1: The Classic File Upload

Ready to get started? The classic file upload is the most common method for a reason—it’s direct, reliable, and gives you complete control over how your data appears in the sheet. This is your go-to for one-off imports or when you need to fine-tune the settings.
The most popular path is using the File > Import > Upload menu inside any Google Sheet. Just grab your CSV file, and Google will open a powerful import dialog box to guide you.
Another great option is a simple drag-and-drop. Open your Google Drive, drag your CSV file from your computer into a folder, and double-click it. Google will automatically open it as a brand-new, clean Google Sheet.
How to Nail the Import Settings
The import settings window is where the magic happens. It’s where you tell Google Sheets exactly how to read your file, and getting it right prevents a lot of headaches later.
Don't let the options fool you. While manual imports are popular, they can be tricky. In fact, research shows that nearly 60% of manual CSV imports lead to formatting errors that users must fix later. You can discover more insights about handling CSV data on coefficient.io. Mastering these settings helps you avoid that cleanup!
Here are the key options to focus on:
Import location: Do you want to create a new spreadsheet, insert the data as a new tab, or append it to an existing sheet? Appending is incredibly useful for adding new rows to a running list.
Separator type: This is the most important one. CSV stands for "Comma-Separated Values," but files often use tabs, semicolons, or custom characters. Choosing the right separator ensures your data splits into columns correctly.
Convert text to numbers, dates, and formulas: I almost always leave this checked. It allows Google Sheets to intelligently format your data, turning text strings into usable numbers and dates.
Pro Tip: Before importing, open your CSV in a simple text editor like Notepad or TextEdit. A quick glance will show you exactly what character is used as the delimiter (comma, semicolon, etc.), so you can select the right one in Sheets with confidence.
Of course, this assumes you have a clean CSV file. If your data is starting in another format, like an Excel spreadsheet, you'll need to save it correctly first. For a detailed guide, check out our guide on how to save an Excel file as a CSV.
Method 2: Pull Live Data with the IMPORTDATA Formula
Manual uploads are great for a one-time analysis, but what if your data is constantly changing? If you're tired of downloading and uploading the same CSV every day, you're going to love this next method.
Meet one of the most powerful functions in Google Sheets: =IMPORTDATA.
This simple function creates a live connection between your spreadsheet and any CSV file hosted online. You can pull daily sales reports, track public health data, or monitor competitor pricing—all without leaving your sheet. It’s a game-changer for building automated dashboards that stay up-to-date.
How the IMPORTDATA Formula Works
The best part about this function is its simplicity. It only needs one piece of information: the URL of the CSV file. Just put that URL into a single cell, and Google Sheets does the rest, fetching the data and arranging it neatly.
The syntax is as straightforward as it gets:
=IMPORTDATA("URL_of_your_CSV_file")
That’s it! Just be sure to wrap the URL in double quotes. The moment you hit Enter, Sheets will fetch the data and fill your grid, creating a dynamic link that keeps your report fresh.
Important: The
=IMPORTDATAfunction is designed for publicly accessible CSV files. If the file is protected by a login or firewall, the formula won't work and will return an error.
Troubleshooting Common Formula Errors
Even with a simple formula, things can sometimes go wrong. Don't worry—most issues are easy to fix.
#REF! Error: This usually means there isn't enough empty space for the data to load. The formula needs a clear runway of blank cells below and to the right. Just clear out any old data where the new content needs to go.
#N/A Error: This often points to a problem with the URL. Double-check that you’ve copied the entire link correctly. A common mistake is linking to a webpage that contains a link to the CSV, rather than the raw CSV file URL itself.
"Loading..." Error: If it seems stuck, the connection might be slow, especially with a large file. Google Sheets refreshes this data automatically (about once an hour). To force an immediate refresh, just delete the formula and paste it back in.
Getting comfortable with this one formula is a huge step toward building smarter, automated workflows. When you pair live data imports with a solid strategy for data collection, you unlock some seriously efficient processes. To go deeper, learn more about how to automate data extraction and start applying these ideas to your own projects.
Method 3: Put Your CSV Imports on Autopilot
Are you manually uploading the same CSV report every day, week, or month? If so, you're ready to put that process on autopilot. This is how you build hands-off data workflows that save time and eliminate repetitive tasks from your to-do list for good.
It’s all about working smarter, not harder. Let's explore how to turn that manual CSV grind into a set-it-and-forget-it process, which is perfect for maintaining live dashboards and tracking projects in real-time.
This simple decision tree can help you figure out where to start.
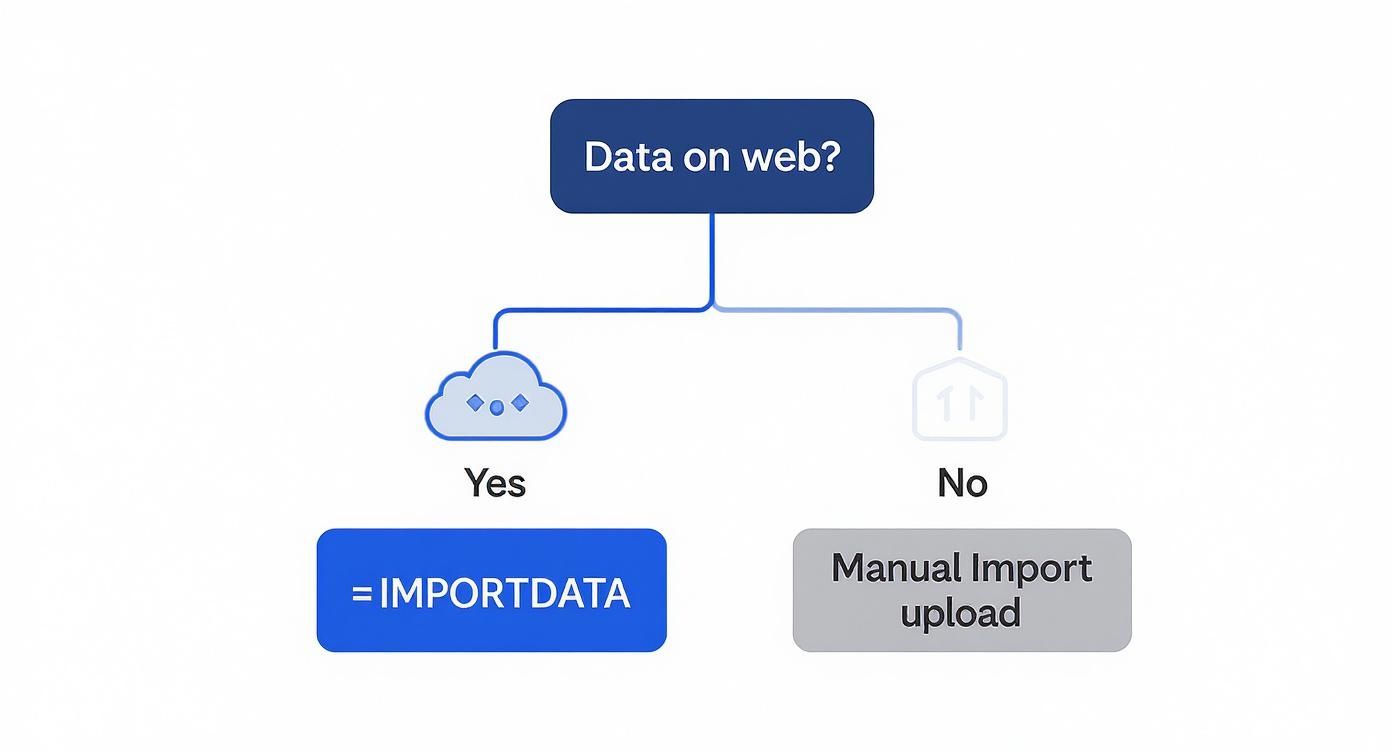
As you can see, the first question is always about your data source. If it’s on a public URL, the IMPORTDATA function we just covered is often the simplest way to create a live connection.
Getting Started with Google Apps Script
For those who want more control, Google Apps Script is the perfect next step. It’s a scripting platform built right into Google Workspace that lets you create custom functions and automate workflows directly inside your spreadsheet.
Think of it as adding a small engine to your Google Sheet. You can write a script that grabs a CSV from a URL and then set a "trigger" to run it for you—every hour, every day, or every Monday morning.
Here's a typical setup:
Write the script: Create a function in Apps Script to fetch a CSV from a URL and place the data into a specific tab.
Set a trigger: Configure a time-driven trigger that tells Google to run that script automatically, like every morning at 8 AM.
Enjoy the automation: That's it! You can now start each day with a freshly updated spreadsheet, no manual work required.
This method gives you a massive amount of flexibility without ever leaving the Google ecosystem.
Tapping into No-Code Automation Platforms
If writing even a little code sounds like a headache, then no-code automation platforms are for you. Tools like Zapier and Make have changed the game, letting you build sophisticated workflows with a simple, visual, drag-and-drop interface.
With these tools, you can connect thousands of different apps without writing a single line of code. For your CSV to Google Sheet workflow, you could build a process that:
Watches a folder: The automation starts when a new CSV file lands in a specific folder in Google Drive, Dropbox, or OneDrive.
Parses the data: It then reads the contents of that new CSV file.
Adds to Google Sheets: Finally, it takes each row from the CSV and adds it as a new row in your target Google Sheet.
This approach is a lifesaver for teams that get regular reports via email or save them to a shared drive. It completely eliminates the tedious "download and upload" dance.
Comparing CSV Automation Methods
This table breaks down the different ways to automate CSV imports so you can choose the best option for your needs.
Method | Best For | Technical Skill | Pros | Cons |
|---|---|---|---|---|
Google Apps Script | Scheduled imports from a URL or Google Drive; custom data processing. | Beginner-to-Intermediate. Basic scripting knowledge is helpful. | Highly customizable, runs inside Google's ecosystem, and it's free. | Requires writing and debugging a small amount of code. |
Zapier / Make | Connecting cloud apps (e.g., Dropbox, email attachments) to Google Sheets. | Beginner. No code required. | Extremely user-friendly, huge library of app integrations, very reliable. | Can get expensive with high volume; less flexible than custom code. |
=IMPORTDATA Formula | Publicly accessible CSVs that need to update periodically. | Beginner. Just a simple formula. | Super easy to set up, updates automatically every hour or so. | Only works with public URLs; less control over the refresh schedule. |
Each method has its place. IMPORTDATA is great for quick public data pulls, Apps Script gives you ultimate power within Google's world, and no-code tools are perfect for connecting all your other apps seamlessly.
Understanding how to automate CSV imports is a massive step. It's worth exploring the top data entry automation solutions to see how much time you can save. For a deeper dive, our guide shows you exactly how to automate data entry and take back your most valuable asset: your time.
Method 4: How to Fix Common Import Errors
https://www.youtube.com/embed/8r0OGKdtEQw
There's nothing worse than importing a fresh CSV, ready to analyze the data, only to find a garbled mess. It’s a total workflow killer! But don't worry—most frustrating import problems are simple to solve once you know what to look for.
Think of this as your troubleshooting guide. We’ll walk through the most common headaches and show you exactly how to fix them.
Problem: "All My Data is Jammed into a Single Column"
This is the number one issue people face. Instead of neat columns, you have one long, chaotic string of text in Column A.
The culprit is almost always a wrong delimiter. A delimiter is the character—usually a comma—that tells a spreadsheet where one piece of data ends and the next begins.
The fix is easy:
Go back to File > Import > Upload and select your CSV again.
In the settings window, find the "Separator type" section.
Instead of "Detect automatically," choose the correct option. If you see semicolons (
;) or tabs in your data, select that. You can even choose "Custom" and type in any character separating your values.
This one tweak tells Sheets how to read your file, and your columns will snap into place.
Problem: "What Are All These Weird Characters and Symbols?"
Ever see text that looks like †or black diamonds with question marks (�)? That’s a classic sign of a character encoding mismatch.
This happens when the system that created the CSV uses a different "alphabet" than what Google Sheets expects (UTF-8). You can't fix this during the import, but you can fix the file before you upload it.
Open the CSV in a program like Microsoft Excel or a free text editor like Sublime Text. Go to "Save As," find the option for encoding, choose UTF-8, save the new version, and import that one instead.
Problem: "My CSV File Is Too Big to Import!"
Google Sheets has a hard limit of 10 million cells per spreadsheet. So, what do you do with a massive CSV? One study found that 85% of data workers who manually upload CSVs run into constraints like this. You can read the full research about these import limitations on bardeen.ai.
When you hit the cell limit, it's a signal to be more strategic with your import.
The simplest approach is to split the giant CSV into a few smaller, more manageable files before uploading.
For a more advanced solution, a Google Apps Script can import the data in batches—say, 50,000 rows at a time—until the entire dataset is loaded. This method bypasses the initial upload limit and lets you work with massive amounts of data.
Frequently Asked Questions
Even with a good plan, you might hit a few snags. Here are quick answers to the questions I hear most often.
How can I automatically update a sheet when a CSV in Google Drive changes?
For coders, the best way is with a Google Apps Script. You can set up a time-driven trigger (e.g., every hour) that checks the CSV file's "last modified" date. If it's newer, the script re-imports the fresh data.
For a no-code approach, tools like Zapier or Make are perfect. Build a workflow with a trigger like "Updated File in Folder" in Google Drive that fires an action to update the rows in your Google Sheet. Set it and forget it!
What’s the best way to handle huge CSV files?
If your CSV is too big for Google Sheets, the golden rule is: don't try to cram it in. Tackle the problem before you import.
The pro move is to use a simple tool like Python with the pandas library to pre-process the data first. With a few lines of code, you can filter the file down to only the essential rows and columns you need.
Power User Tip: If you truly need to analyze the entire massive dataset, upload the full CSV directly to Google BigQuery. From there, you can use the Connected Sheets feature to query billions of rows right from the Google Sheets interface without crashing your browser.
Can I import only specific columns from a CSV?
Absolutely! While the standard File > Import option brings everything over, you can create a focused view with a simple formula in two steps.
First, import the entire CSV into its own dedicated tab (e.g., "RawData").
Next, in a new, clean sheet, use the powerful
=QUERYfunction to select only the columns you care about.
For example, a formula like =QUERY(RawData!A:Z, "SELECT A, C, F", 1) will instantly create a live, filtered view showing just columns A, C, and F from your raw data, including the headers. It’s clean, fast, and keeps your original data untouched.
Ready to skip messy files altogether? Clura is a browser-based AI agent that lets you scrape, organize, and export perfectly clean CSV files from any website in a click. Stop cleaning up data and start building better lead lists, monitoring competitor prices, and tracking market trends. Explore prebuilt templates and get started for free at Clura.
